
English
Images, printing, and custom controls
Images, export, and printing
The Image and Bitmap classes
The abstract Image class describes an image, and its descendant Bitmap is a raster image with an array of pixels (https://learn.microsoft.com/dotnet/api/system.drawing.bitmap). GDI+ reads the BMP, PNG, JPEG, GIF, TIFF, and ICO formats and writes BMP, PNG, JPEG, GIF, and TIFF. The main operations:
Image.FromFile(path)ornew Bitmap(path)—load an image from a file;new Bitmap(width, height)—create an empty image (32 bits per pixel with transparency);g.DrawImage(image, x, y)—draw at natural size;g.DrawImage(image, rectangle)—scale into a rectangle;g.InterpolationMode = InterpolationMode.HighQualityBicubic—high-quality scaling (slower thanNearestNeighbor, which keeps pixels sharp for pixel art);bitmap.Save(path, ImageFormat.Png)—save to a file.
Important
Image.FromFile keeps the file open until the image is released: while the program is running, the file cannot be overwritten or deleted. If the image is needed for a long time, create a copy in memory (new Bitmap(file)) and release the loaded image immediately.
Drawing into a Bitmap and saving as PNG
The Graphics.FromImage(bitmap) method returns a Graphics object that draws into the image. The same code that draws on screen can create a file. This is how the paint editor saves a drawing: the Bitmap dimensions equal the canvas dimensions, the background is filled with white (otherwise it is transparent), and the selection handles are not drawn:
cs
private void SavePng()
{
    using var dialog = new SaveFileDialog
    {
        Filter = "PNG image (*.png)|*.png",
        FileName = "drawing.png"
    };
    if (dialog.ShowDialog(this) != DialogResult.OK) return;

    using var bitmap = new Bitmap(canvas.Width, canvas.Height);
    using (Graphics g = Graphics.FromImage(bitmap))
    {
        g.Clear(Color.White);
        DrawShapes(g, false);              // without selection handles
    }
    bitmap.Save(dialog.FileName, ImageFormat.Png);
}
The PNG format stores images losslessly and is suitable for diagrams and charts; JPEG compresses with losses and is suitable for photos. The System.Drawing.Imaging namespace must be included with a using directive. Any control can also be saved as an image with the control.DrawToBitmap(bitmap, rectangle) method.
Working with pixels
The GetPixel(x, y) and SetPixel(x, y, color) methods read and change an individual pixel. For example, conversion to grayscale calculates the brightness of each pixel as a weighted sum of the components:
cs
static Bitmap ToGray(Bitmap source)
{
    var result = new Bitmap(source.Width, source.Height);
    for (int y = 0; y < source.Height; y++)
    {
        for (int x = 0; x < source.Width; x++)
        {
            Color c = source.GetPixel(x, y);
            int gray = (int)(0.299 * c.R + 0.587 * c.G
                + 0.114 * c.B);
            result.SetPixel(x, y,
                Color.FromArgb(c.A, gray, gray, gray));
        }
    }
    return result;
}
The GetPixel and SetPixel methods are simple but slow: each call checks the coordinates and locks the image. For a 1920 × 1080 image (over 2 million pixels), this method took 0.76 s on the test computer. For fast processing, use the LockBits method, which provides direct access to the image's byte array (BitmapData), and call UnlockBits after processing (https://learn.microsoft.com/dotnet/api/system.drawing.imaging.bitmapdata).
Printing
Printing in Windows Forms is built on the same event model as drawing in a window. The PrintDocument class (the System.Drawing.Printing namespace) describes a document; for each page, it raises the PrintPage event, in which the program draws the page through e.Graphics (https://learn.microsoft.com/dotnet/api/system.drawing.printing.printdocument). The PrintPageEventArgs e parameter contains:
e.Graphics—the page "canvas"; the default unit is 1/100 inch;e.MarginBounds—the page rectangle without margins (1-inch margins by default);e.PageBounds—the entire page;e.HasMorePages—set it totrueif there is another page after this one: thePrintPageevent will run again.
The paint editor creates a one-page document. The drawing is moved within the margins and, if necessary, reduced so that both the width and height fit:
cs
    private PrintDocument CreateDocument()
    {
        var document = new PrintDocument { DocumentName = "Drawing" };
        document.PrintPage += (sender, e) =>
        {
            Graphics g = e.Graphics!;
            Rectangle m = e.MarginBounds;      // page margins
            float scale = Math.Min(1f, Math.Min(
                (float)m.Width / canvas.Width,
                (float)m.Height / canvas.Height));
            g.TranslateTransform(m.Left, m.Top);
            g.ScaleTransform(scale, scale);
            g.DrawRectangle(Pens.Black, 0, 0,
                canvas.Width, canvas.Height);
            DrawShapes(g, false);
            e.HasMorePages = false;            // one page
        };
        return document;
    }

    private void ShowPrintPreview()
    {
        using PrintDocument document = CreateDocument();
        using var preview = new PrintPreviewDialog
        {
            Document = document,
            ClientSize = new Size(800, 600)
        };
        preview.ShowDialog(this);
    }
}
The page unit is 1/100 inch, so a 700-pixel-wide canvas on an A4 page (8.27 inches) with 1-inch margins is reduced to the width of the area—627 units. To print the document on a selected printer, use the PrintDialog dialog:
cs
using var printDialog = new PrintDialog { Document = document };
if (printDialog.ShowDialog(this) == DialogResult.OK)
    document.Print();
The PrintDialog dialog lets you choose the printer, the number of copies, and the pages (https://learn.microsoft.com/dotnet/api/system.windows.forms.printdialog). The PrintPreviewDialog dialog shows the pages on screen before printing (Fig. 4.9): all it needs is for the Document property to be set and ShowDialog to be called (https://learn.microsoft.com/dotnet/api/system.windows.forms.printpreviewdialog). To test printing without paper, select the Microsoft Print to PDF virtual printer in the dialog.
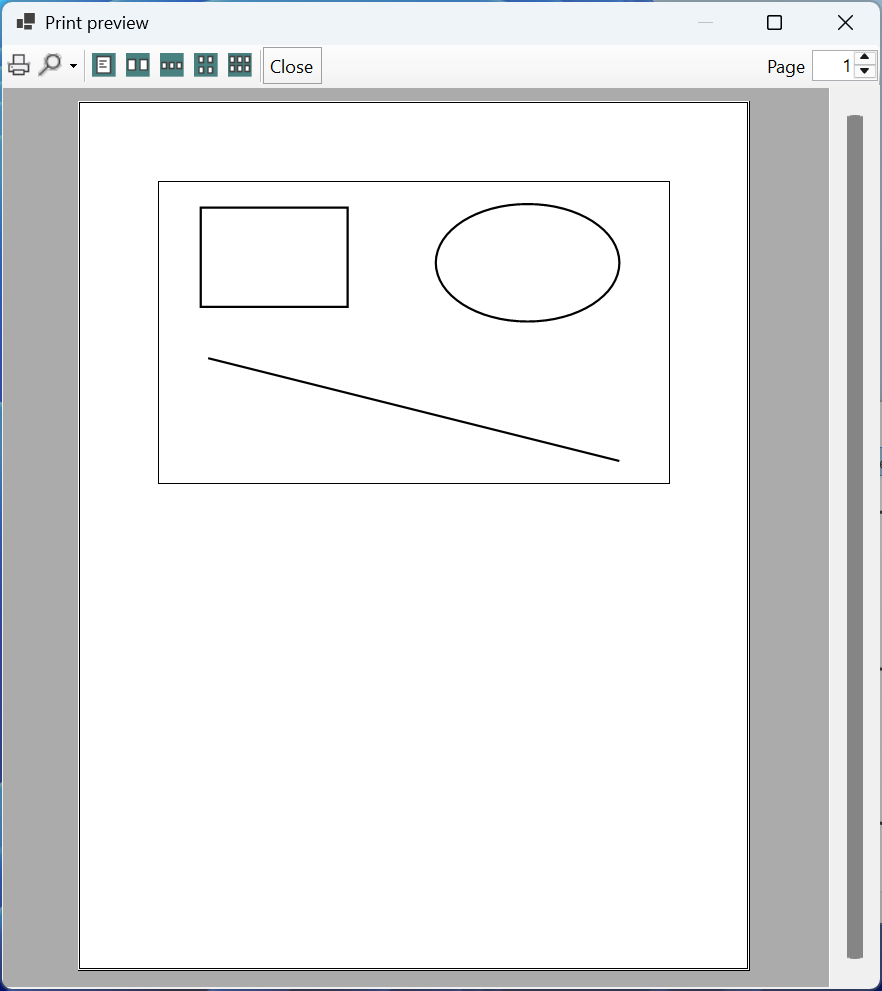
Figure 4.9. Print preview of a drawing
A custom control
If a drawing is needed in several forms, it is packaged as a custom control: a class derived from Control that paints itself in OnPaint (https://learn.microsoft.com/dotnet/desktop/winforms/controls/custom). Such a control has properties and events, appears in the Toolbox after the project is built, and is edited in the Properties window just like the standard controls.
Rules for creating one:
- in the constructor, enable the
UserPaint,AllPaintingInWmPaint,OptimizedDoubleBuffer, andResizeRedrawstyles; - in the setter of each property that affects the appearance, validate the value and call
Invalidate(); - for the background and font, use the control's
BackColor,ForeColor, andFontproperties; - mark properties with attributes from the
System.ComponentModelnamespace:[Category](the group in the Properties window),[Description](the hint at the bottom of the window),[DefaultValue](the default value: it is not written toDesigner.csand is shown in regular rather than bold font).
cs
using System.ComponentModel;

namespace Gauge;

// A semicircular gauge: an arc whose length is proportional to Value.
public class GaugeControl : Control
{
    private int value;

    public GaugeControl()
    {
        SetStyle(ControlStyles.UserPaint
            | ControlStyles.AllPaintingInWmPaint
            | ControlStyles.OptimizedDoubleBuffer
            | ControlStyles.ResizeRedraw, true);
    }

    [Category("Gauge")]
    [Description("Current value from 0 to 100.")]
    [DefaultValue(0)]
    public int Value
    {
        get => value;
        set { this.value = Math.Clamp(value, 0, 100); Invalidate(); }
    }

    protected override void OnPaint(PaintEventArgs e)
    {
        base.OnPaint(e);
        if (Width < 30 || Height < 30) return;
        var box = new Rectangle(10, 10, Width - 20, 2 * Height - 40);
        using var track = new Pen(Color.Gainsboro, 12);
        using var bar = new Pen(ForeColor, 12);
        e.Graphics.DrawArc(track, box, 180, 180);
        e.Graphics.DrawArc(bar, box, 180, 180f * value / 100);
    }
}
The gauge is a thick light gray 180° arc (the upper half of an ellipse), on top of which an arc in the ForeColor color (black by default) occupies a part proportional to the value. In form code, the control is used like any other: var gauge = new GaugeControl { Value = 65 };, and changing gauge.Value immediately repaints the gauge.
Important
In .NET 10, the Windows Forms analyzer checks the public properties of controls. If a property has no [DefaultValue] or [DesignerSerializationVisibility] attribute and no ShouldSerializeValue method, the build fails with error WFO1000 Property 'Value' does not configure the code serialization for its property content. The attribute tells the form designer whether the value must be written to Designer.cs.
After the project is built (Ctrl+Shift+B), the control appears in the Toolbox window in a section named after the project (Fig. 4.10). You drag it onto the form, and the Value property is found in the Properties window in the Gauge group (https://learn.microsoft.com/dotnet/desktop/winforms/controls-design/how-to-create-usercontrol).
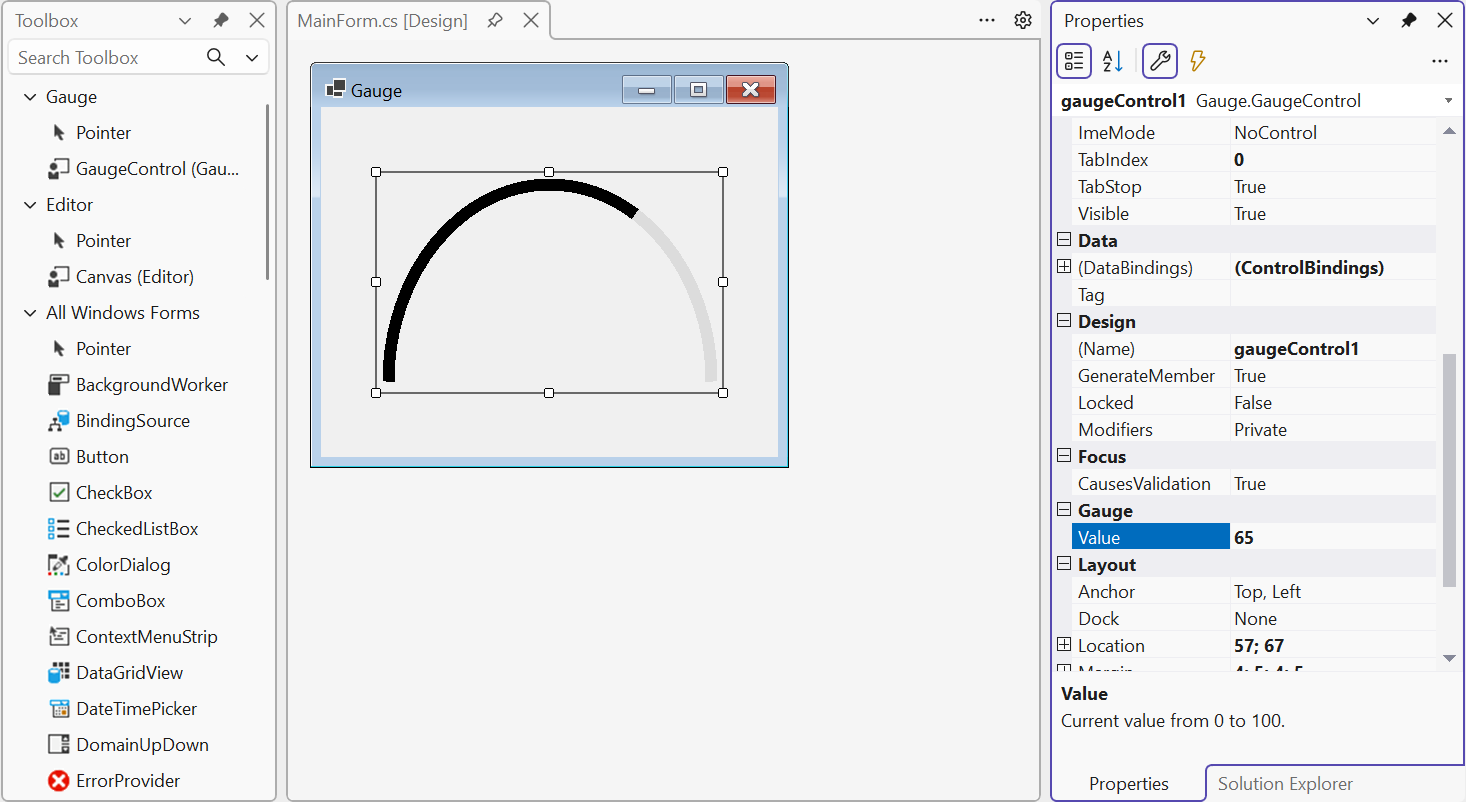
Figure 4.10. A custom control in the Toolbox and the Properties window