
English
Animation and drawing with the mouse
Animation and double buffering
Animation is a sequence of frames: at regular intervals, the program changes the data (the angle of a clock hand, the position of a ball) and calls Invalidate(). For timing, Windows Forms has the System.Windows.Forms.Timer component (https://learn.microsoft.com/dotnet/api/system.windows.forms.timer). Its Tick event runs on the UI thread every Interval milliseconds, so the handler can safely change the form's fields and call Invalidate(). The timer's accuracy is limited (the documentation cites 55 ms), so for motion you should calculate the position from real time (DateTime.Now, Stopwatch) rather than count Tick calls.
Flicker and how to eliminate it
An ordinary form is drawn directly on the screen: first the background (OnPaintBackground), then the shapes one by one. If the drawing is complex and is repainted often, the user sees intermediate frames—flicker. Double buffering eliminates it: all operations are performed in a buffer in memory, and the finished frame reaches the screen in a single copy operation (Fig. 4.6) (https://learn.microsoft.com/dotnet/desktop/winforms/advanced/how-to-reduce-graphics-flicker-with-double-buffering-for-forms-and-controls).
Figure 4.6. Drawing without a buffer and with double buffering
Standard controls already use double buffering. For a form or a custom control, it is enabled in one of two ways:
cs
// In the constructor of a form or a Control descendant.
DoubleBuffered = true;

// Or styles for a control that paints itself entirely.
SetStyle(ControlStyles.OptimizedDoubleBuffer
    | ControlStyles.AllPaintingInWmPaint
    | ControlStyles.UserPaint, true);
The AllPaintingInWmPaint style disables separate background erasing (the background is painted together with everything else in OnPaint), and UserPaint means the control paints itself rather than the operating system (https://learn.microsoft.com/dotnet/api/system.windows.forms.controlstyles). The DoubleBuffered property and the SetStyle method are protected, so for a Panel or another ready-made control you must create a descendant, as in the "Paint editor" example.
You can also create a buffer yourself: draw the frame into a Bitmap, and in OnPaint just copy it with the DrawImage method. This is done when the drawing accumulates (brush strokes in an editor) or when it is expensive to redraw for every WM_PAINT.
The "Analog clock" example
The clock is repainted by a timer every 200 ms. The origin is moved to the center of the clock face, the tick marks are drawn by rotating the system, and each hand is drawn in a temporarily rotated system between Save and Restore (Fig. 4.7). The hands differ in thickness and length: the hour hand is the shortest and thickest, and the second hand is the thinnest and longest.
cs
using System.Drawing.Drawing2D;

namespace Clock;

public class MainForm : Form
{
    private readonly System.Windows.Forms.Timer timer = new();

    public MainForm()
    {
        Text = "Analog Clock";
        ClientSize = new Size(360, 360);
        BackColor = Color.White;
        DoubleBuffered = true;       // no flicker
        ResizeRedraw = true;
        timer.Interval = 200;        // milliseconds
        timer.Tick += (sender, e) => Invalidate();
        timer.Start();
    }

    protected override void OnPaint(PaintEventArgs e)
    {
        base.OnPaint(e);
        DrawClock(e.Graphics, ClientSize, DateTime.Now);
    }

    protected override void Dispose(bool disposing)
    {
        if (disposing) timer.Dispose();
        base.Dispose(disposing);
    }
The full name System.Windows.Forms.Timer is needed because the implicit using directives also bring in Timer classes from the System.Threading and System.Timers namespaces, whose events run on another thread. The timer is released in the form's overridden Dispose method. The DrawClock method receives the time as a parameter, so it is easy to check for any moment:
cs
public static void DrawClock(Graphics g, Size client,
    DateTime time)
{
    float r = Math.Min(client.Width, client.Height) / 2f - 10;
    if (r < 40) return;
    g.SmoothingMode = SmoothingMode.AntiAlias;
    // The origin is at the center of the clock face.
    g.TranslateTransform(client.Width / 2f, client.Height / 2f);

    using var rim = new Pen(Color.Black, 4);
    g.DrawEllipse(rim, -r, -r, 2 * r, 2 * r);
    DrawMarks(g, r);

    float hours = time.Hour % 12 + time.Minute / 60f;
    float minutes = time.Minute + time.Second / 60f;
    DrawHand(g, Color.Black, hours * 30, r * 0.5f, 8);
    DrawHand(g, Color.Black, minutes * 6, r * 0.75f, 5);
    DrawHand(g, Color.Firebrick, time.Second * 6, r * 0.85f, 2);
    g.FillEllipse(Brushes.Black, -6, -6, 12, 12);
}
An hour corresponds to 30° (360° / 12), and a minute and a second to 6°. The hour hand takes minutes into account, so at 10:30 it is halfway between 10 and 11.
cs
// 60 tick marks: after each one, the system rotates by 6°.
private static void DrawMarks(Graphics g, float r)
{
    using var thin = new Pen(Color.Black, 1);
    using var thick = new Pen(Color.Black, 4);
    for (int i = 0; i < 60; i++)
    {
        bool isHour = i % 5 == 0;
        float inner = isHour ? r - 18 : r - 9;
        g.DrawLine(isHour ? thick : thin, 0, -r + 3, 0, -inner);
        g.RotateTransform(6);
    }
}
Each hand is drawn in a temporarily rotated system:
cs
    private static void DrawHand(Graphics g, Color color,
        float angle, float length, float width)
    {
        GraphicsState state = g.Save();
        g.RotateTransform(angle);         // 0° – toward 12
        using var pen = new Pen(color, width);
        pen.StartCap = LineCap.Round;
        pen.EndCap = LineCap.Round;
        g.DrawLine(pen, 0, length * 0.15f, 0, -length);
        g.Restore(state);
    }
}
After 60 rotations of 6°, the system returns to its original position (360°), so the hands are drawn relative to the vertical. The numbers on the dial cannot be drawn in a rotated system: they would lie on their sides; their centers are calculated with Math.Sin and Math.Cos. A hand is drawn along the negative y axis (up) with a short "tail" behind the center.
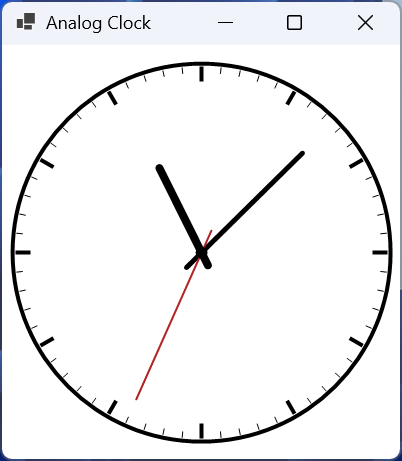
Figure 4.7. The "Analog clock" application
Interactive drawing with the mouse
As the mouse moves over a control, the MouseDown (button pressed), MouseMove (cursor moves), and MouseUp (button released) events are raised, as well as MouseClick, MouseDoubleClick, and MouseWheel. The MouseEventArgs e parameter contains the cursor coordinates e.X, e.Y (e.Location) in the control's coordinate system and the e.Button button. Screen coordinates are returned by Cursor.Position and converted with the PointToClient and PointToScreen methods.
Drawing with the mouse is usually structured as follows:
MouseDown—create a new shape with a starting point or find the shape under the cursor;MouseMovewith the button pressed—change the shape's end point or move the selected shape and callInvalidate();MouseUp—finish the action;Paint—draw all shapes in the list.
The drawing is stored as a model—a list of shape objects, not pixels. This lets you select and move shapes, save them to a file, and draw them at any scale.
The "Paint editor" example
The editor draws lines, rectangles, and ellipses, lets you select a shape by clicking and drag it, shows the cursor coordinates in the status bar, saves the drawing as PNG, and shows a print preview (Fig. 4.8). The shapes form a class hierarchy: the abstract base class Shape and descendants that describe their own GraphicsPath outline (the Shapes.cs file).
cs
using System.Drawing.Drawing2D;

namespace Editor;

// A shape is defined by two points: the start and end of the mouse drag.
public abstract class Shape
{
    public Point Start { get; set; }
    public Point End { get; set; }

    public Rectangle Bounds => Rectangle.FromLTRB(
        Math.Min(Start.X, End.X), Math.Min(Start.Y, End.Y),
        Math.Max(Start.X, End.X), Math.Max(Start.Y, End.Y));
The Bounds property normalizes the rectangle: the user can drag the mouse in any direction, and the width and height are always positive. Drawing and hit testing use the path created by the descendant:
cs
// Each descendant describes its own path.
protected abstract GraphicsPath CreatePath();

public void Draw(Graphics g, Pen pen)
{
    using GraphicsPath path = CreatePath();
    g.DrawPath(pen, path);
}

// A hit inside the shape or near its outline.
public bool HitTest(Point point)
{
    using GraphicsPath path = CreatePath();
    using var zone = new Pen(Color.Black, 10);
    return path.IsVisible(point)
        || path.IsOutlineVisible(point, zone);
}
For a line, IsVisible always returns False (the path has no area), so the IsOutlineVisible check with a 10-pixel-wide pen does the work.
cs
    public void Offset(int dx, int dy)
    {
        Start = new Point(Start.X + dx, Start.Y + dy);
        End = new Point(End.X + dx, End.Y + dy);
    }
}

public class LineShape : Shape
{
    protected override GraphicsPath CreatePath()
    {
        var path = new GraphicsPath();
        path.AddLine(Start, End);
        return path;
    }
}

public class RectangleShape : Shape
{
    protected override GraphicsPath CreatePath()
    {
        var path = new GraphicsPath();
        path.AddRectangle(Bounds);
        return path;
    }
}

public class EllipseShape : Shape
{
    protected override GraphicsPath CreatePath()
    {
        var path = new GraphicsPath();
        path.AddEllipse(Bounds);
        return path;
    }
}
To add a new kind of shape (a triangle, an arrow), one more Shape descendant is enough: the form code works with a List<Shape> and does not depend on the concrete classes. The form (the MainForm.cs file) creates a ToolStrip toolbar, a canvas, and a StatusStrip status bar:
cs
using System.Drawing.Drawing2D;
using System.Drawing.Imaging;
using System.Drawing.Printing;

namespace Editor;

public enum Tool { Select, Line, Rectangle, Ellipse }

// A Panel with double buffering: the property is protected.
public class Canvas : Panel
{
    public Canvas()
    {
        DoubleBuffered = true;
        BackColor = Color.White;
    }
}
The form's fields store the drawing model (the list of shapes) and the state of mouse interaction:
cs
public class MainForm : Form
{
    private readonly List<Shape> shapes = [];
    private readonly Canvas canvas = new() { Dock = DockStyle.Fill };
    private readonly ToolStrip toolBar = new();
    private readonly ToolStripStatusLabel status = new();
    private Tool tool = Tool.Line;
    private Shape? drawing;       // the shape being drawn now
    private Shape? selected;      // the selected shape
    private Point lastPoint;      // the previous mouse position
cs
public MainForm()
{
    Text = "Paint Editor";
    ClientSize = new Size(700, 480);
    foreach (Tool t in Enum.GetValues<Tool>())
        toolBar.Items.Add(t.ToString(), null, (s, e) => tool = t);
    toolBar.Items.Add(new ToolStripSeparator());
    toolBar.Items.Add("Save PNG...", null, (s, e) => SavePng());
    toolBar.Items.Add("Print Preview...", null,
        (s, e) => ShowPrintPreview());
    var statusBar = new StatusStrip();
    statusBar.Items.Add(status);

    Controls.Add(canvas);     // Fill is added first
    Controls.Add(toolBar);
    Controls.Add(statusBar);
    canvas.Paint += (s, e) => DrawShapes(e.Graphics, true);
    canvas.MouseDown += Canvas_MouseDown;
    canvas.MouseMove += Canvas_MouseMove;
    canvas.MouseUp += (s, e) => drawing = null;
}
The tool buttons are created in a loop over the values of the Tool enumeration: each button's lambda expression captures its own value t. The selected tool and the cursor coordinates are shown in the status bar. The control with DockStyle.Fill is added first so that the strips docked at the top and bottom do not cover the canvas. The mouse handlers implement the steps described above:
cs
private void Canvas_MouseDown(object? sender, MouseEventArgs e)
{
    if (e.Button != MouseButtons.Left) return;
    lastPoint = e.Location;
    if (tool == Tool.Select)
    {
        // The topmost shape is the last in the list, so search from the end.
        selected = shapes.LastOrDefault(
            s => s.HitTest(e.Location));
    }
    else
    {
        drawing = tool switch
        {
            Tool.Line => new LineShape(),
            Tool.Rectangle => new RectangleShape(),
            _ => new EllipseShape()
        };
        drawing.Start = drawing.End = e.Location;
        shapes.Add(drawing);
        selected = null;
    }
    canvas.Invalidate();
}
cs
private void Canvas_MouseMove(object? sender, MouseEventArgs e)
{
    status.Text = $"{tool}   X: {e.X}, Y: {e.Y}";
    if (e.Button != MouseButtons.Left) return;
    if (drawing != null)
    {
        drawing.End = e.Location;          // stretching
    }
    else if (selected != null)
    {
        selected.Offset(e.X - lastPoint.X, e.Y - lastPoint.Y);
        lastPoint = e.Location;            // dragging
    }
    canvas.Invalidate();
}

private void DrawShapes(Graphics g, bool showSelection)
{
    g.SmoothingMode = SmoothingMode.AntiAlias;
    using var pen = new Pen(Color.Black, 3);
    foreach (Shape shape in shapes)
        shape.Draw(g, pen);                // a polymorphic call

    if (!showSelection || selected == null) return;
    Rectangle r = selected.Bounds;
    using var frame = new Pen(Color.Gray);
    frame.DashStyle = DashStyle.Dash;
    g.DrawRectangle(frame, r);
    Point[] handles = [new(r.Left, r.Top), new(r.Right, r.Top),
        new(r.Left, r.Bottom), new(r.Right, r.Bottom)];
    foreach (Point p in handles)
        g.FillRectangle(Brushes.Black, p.X - 4, p.Y - 4, 8, 8);
}
The selected shape is marked with a dashed frame and black square handles at the corners. When saving and printing, the handles are not needed, so DrawShapes has a showSelection parameter. The SavePng, CreateDocument, and ShowPrintPreview methods referenced by the toolbar buttons complete the MainForm class; they are covered in the next section. While testing the editor, a rectangle, an ellipse, and a line were drawn; clicking near the line in Select mode selects it, and clicking an empty area clears the selection (Fig. 4.8).
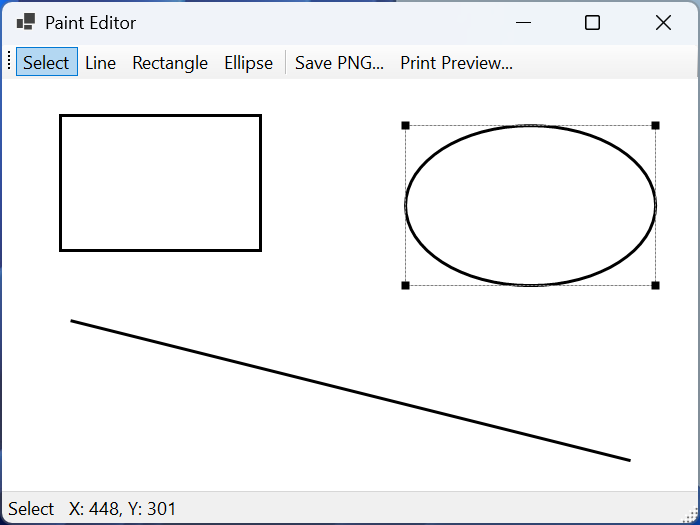
Figure 4.8. The "Paint editor" application