
English
Encapsulation and access modifiers
Encapsulation
Encapsulation is one of the core principles of OOP: a class hides its internal state and implementation details and exposes only a public contract, the set of methods and properties through which you work with the object (Fig. 8.1).
Figure 8.1. Encapsulation: the public contract and hidden state
Encapsulation ensures that an object is always in a valid state. A condition that must hold for every object of a class throughout its lifetime is called a class invariant: “the account balance is not negative,” “an event does not end before it starts,” “the quantity of goods does not exceed the warehouse capacity.” If the balance field is public, any line of the program can write −1000 to it and break the invariant. If the field is private, the balance can change only through the Deposit and Withdraw methods, which check the condition, so a violation becomes impossible.
Other benefits of encapsulation:
- freedom to change: you can change the internal implementation (an array instead of several fields, a different way of calculating) without changing the code that uses the class;
- ease of use: users of the class do not need to know how it works inside;
- localized errors: if the state is invalid, you only need to look for the bug in the class’s own methods.
That is why fields are made private, and access to data is provided through properties and methods.
Access modifiers
Access modifiers determine where a type or type member can be accessed from (https://learn.microsoft.com/dotnet/csharp/programming-guide/classes-and-structs/access-modifiers). Fig. 8.2 and Table 8.1 show the access scopes.
Figure 8.2. Access scopes: the class, derived classes, and assemblies
Table 8.1. Access to member m of class C depending on the modifier
| Modifier | The class itself | Derived, A | Other, A | Derived, B | Other, B |
|---|---|---|---|---|---|
public | yes | yes | yes | yes | yes |
protected internal | yes | yes | yes | yes | no |
internal | yes | yes | yes | no | no |
protected | yes | yes | no | yes | no |
private protected | yes | yes | no | no | no |
private | yes | no | no | no | no |
public— unrestricted access;private— only inside the class;internal— within the assembly (project);protected— in the class and its derived classes, even from another assembly;protected internal— within the assembly or in derived classes;private protected— in derived classes of the same assembly.
The three options involving protected relate to inheritance and are covered in detail in Topic 9. There is also a separate file modifier for types (C# 11): the type is visible only in the file where it is declared.
Default access. If no modifier is specified, class members (fields, methods, properties, nested types) are private, and top-level types (classes not nested in other classes) are internal. A member cannot be more accessible than its type: a public method of an internal class is effectively accessible only within the assembly. Attempting to access an inaccessible member causes error CS0122 is inaccessible due to its protection level.
The assembly as an access boundary
An assembly is the result of compiling one project: a .dll or .exe file (Topic 1). The internal modifier lets classes in one assembly work together while hiding helper types from other assemblies. This becomes important when a program consists of several projects: for example, a class library containing domain logic and a console application that uses it (Fig. 8.3). This structure lets you use the same library in different applications and in a unit test project (Topic 18) (https://learn.microsoft.com/dotnet/core/tutorials/library-with-visual-studio).
Figure 8.3. A solution with a console application and a class library
To create a two-project solution in Visual Studio, right-click the solution in Solution Explorer → Add → New Project… → the Class Library template (Fig. 8.4), then right-click the console project → Add → Project Reference… and select the library (Fig. 8.5). The same steps in the dotnet CLI:
dotnet new sln -n Bank
dotnet new classlib -n Bank.Core
dotnet new console -n Bank.App
dotnet sln add Bank.Core Bank.App
dotnet add Bank.App reference Bank.Core
dotnet run --project Bank.App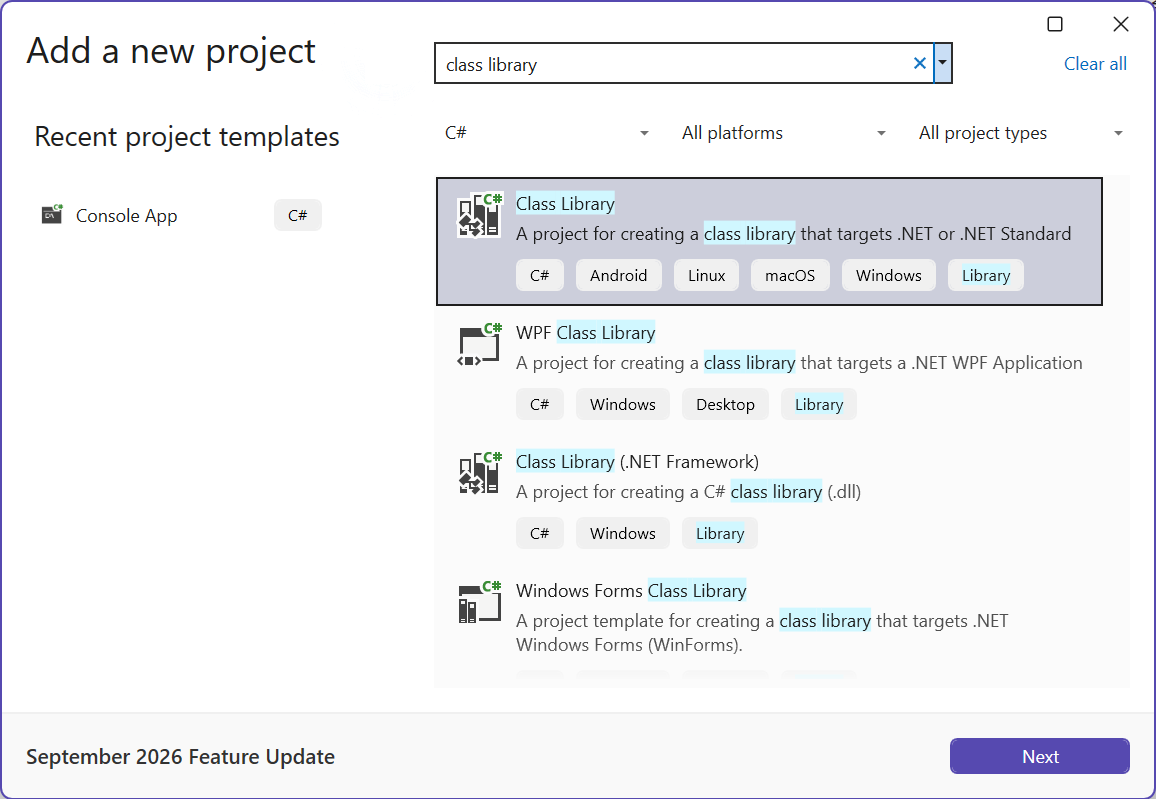
Figure 8.4. Creating a class library project
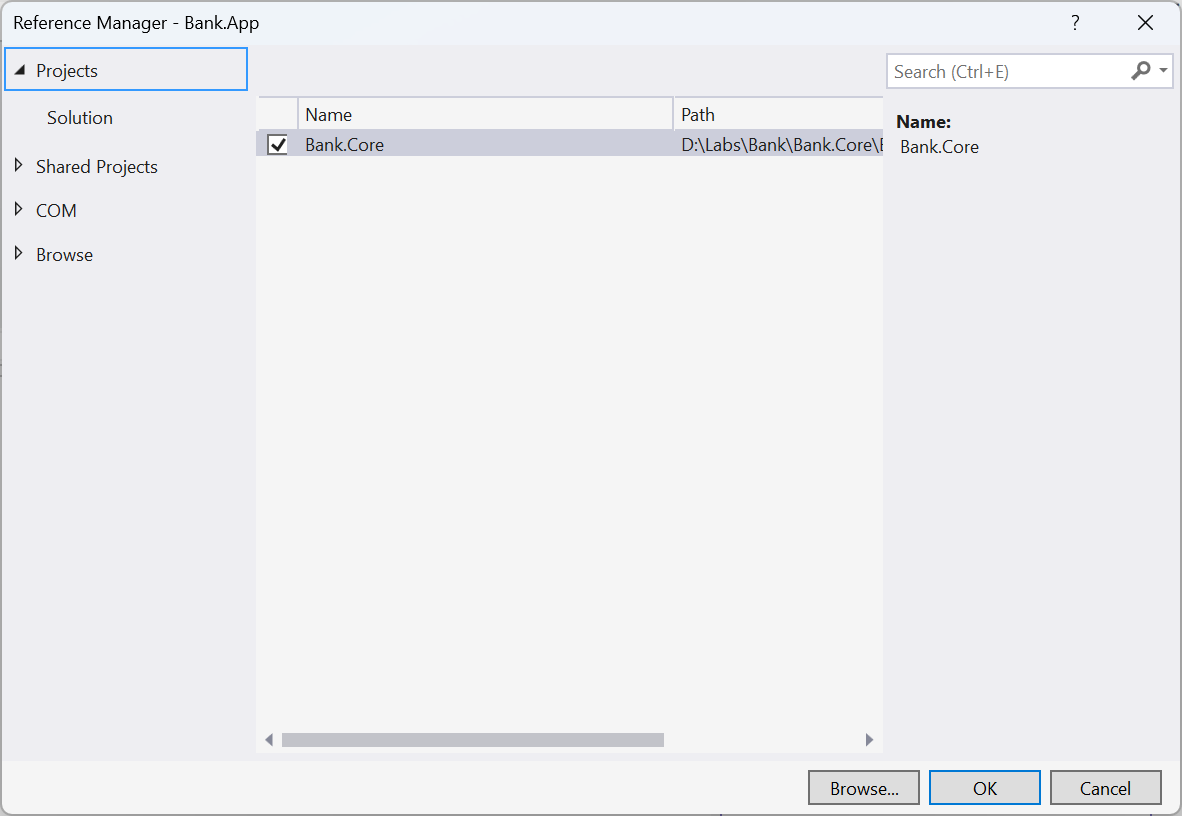
Figure 8.5. Adding a project reference
The reference is written to the console project file as a ProjectReference element:
xml
<ItemGroup>
  <ProjectReference Include="..\Bank.Core\Bank.Core.csproj" />
</ItemGroup>
If the console project accesses an internal class of the library, the compiler reports error CS0122 (Fig. 8.6).
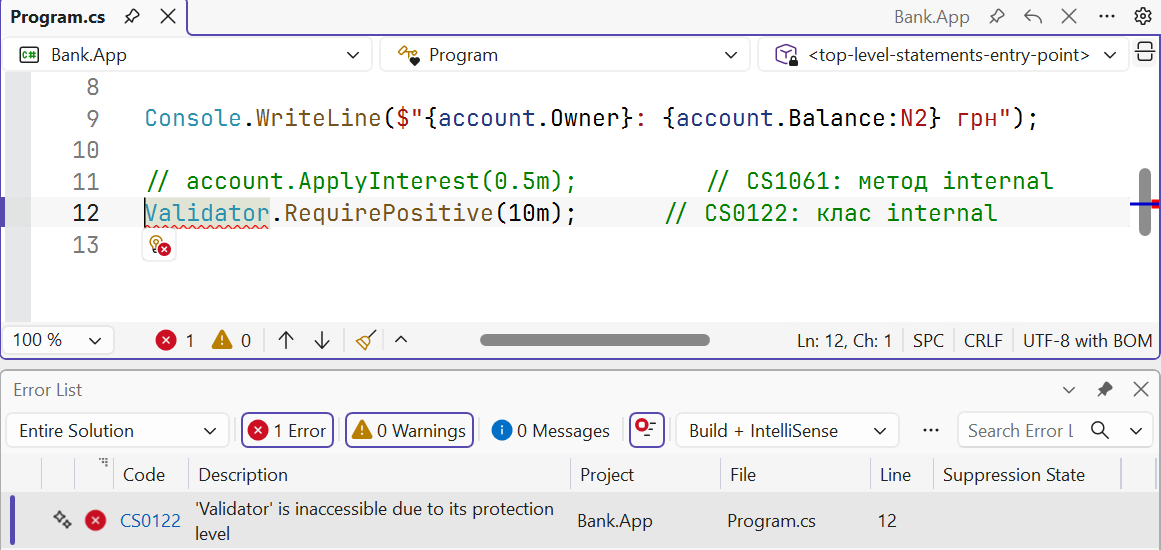
Figure 8.6. Error accessing an internal class