
English
Git version control
Git version control
A version control system stores the history of changes. Git (https://git-scm.com/) works with a local repository: you don’t need the internet to create a commit. GitHub is a repository hosting service; it is not another name for Git. A local history is enough to get started, and a remote repository helps you hand in work and collaborate.
A commit stores the staged state of files and metadata: the author, the message, and the link to the previous history. The index (staging area) lets you choose changes for the next commit. Saving a file in the editor, adding it to the index, and creating a commit are three separate actions (Fig. 1.16). If you change a file after git add, you need to add it again so that the new change is also included in the commit.
Figure 1.16. The working directory, the index, and Git repositories
Installation and initial setup
Download Git for Windows from https://git-scm.com/downloads/win. The installer lets you choose the message editor and the initial branch name (Fig. 1.17). In this course, we use main. After installation, open a new terminal and run git --version. If the command is not found, check the installation and PATH rather than changing your C++ source code.
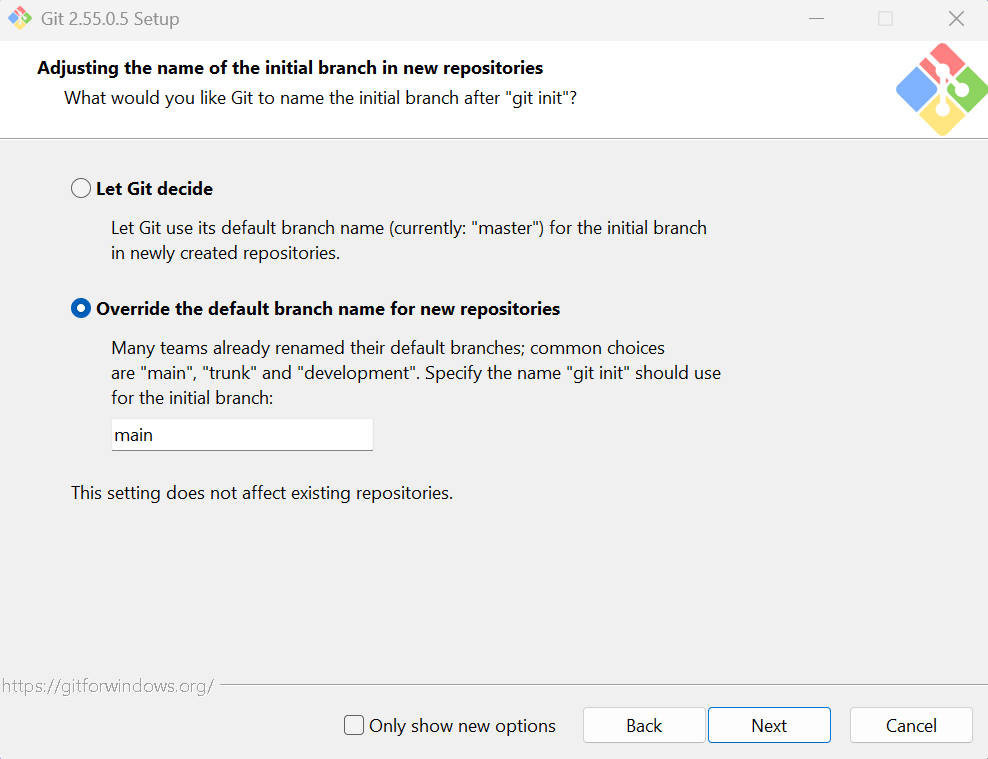
Figure 1.17. Initial Git for Windows options
Set the author’s name and email once. Replace the sample values shown with your own or with the privacy address the service provides. They go into the commit history; this is not a password or a way to sign in to GitHub.
powershell
git config --global user.name "Student Name"
git config --global user.email "[email protected]"
git config --global init.defaultBranch main
--global applies the setting to the current user of the computer. On a shared workstation, it makes sense to configure it inside the repository without --global so that you don’t sign other people’s work with your name. You can check a specific value with the git config user.name command.
The .gitignore file and the first commit
In the solution root, create .gitignore before the first git add. For a simple classroom solution, these rules are enough:
text
.vs/
x64/
Debug/
Release/
*.obj
*.exe
*.pdb
*.ilk
*.user
The .gitignore file is also stored in Git. It defines which untracked files are not offered for adding. If a file has already been committed, a new rule doesn’t remove it from the history. The .cpp, .h, .vcxproj, .vcxproj.filters, .slnx, or .sln files are required source materials. For Example 4 with a standalone .cpp, the same rules will exclude the outputs of cl.
Go to the root of your solution, where .gitignore should be. Don’t create a repository in every service subfolder. Run:
powershell
git init -b main
git status
git add .
git diff --cached
git commit -m "Add greeting program"
git log --oneline
git status
git status shows the current state, git add . stages changes from the current folder, and git diff --cached lets you review the staged difference before committing. git log --oneline shows a compact history. A commit identifier depends on its contents and metadata, so it doesn’t have to match someone else’s screenshot. After a successful commit and with no new changes, Git reports nothing to commit, working tree clean.
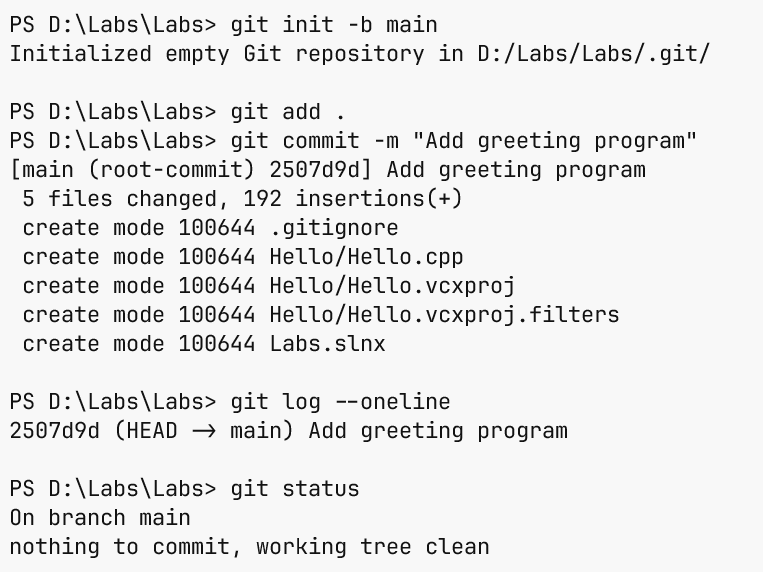
Figure 1.18. The first commit in the terminal
Change the greeting text, save the file, and run git diff. The command shows changes that are not yet staged. After checking them, add the file and create a new commit with a meaningful message. One commit should correspond to one clear change, for example “Add formatted student card”. A message like “work” or “123” doesn’t help anyone understand the history.
Working with Git in Visual Studio
For a new solution without a repository, select Git → Create Git Repository… (Fig. 1.19), and check the local path and the Visual Studio ignore template. You can create a local repository without publishing it. If you have already run git init in this folder, open the existing repository rather than creating a nested one. Publishing to GitHub is a separate decision of the user.
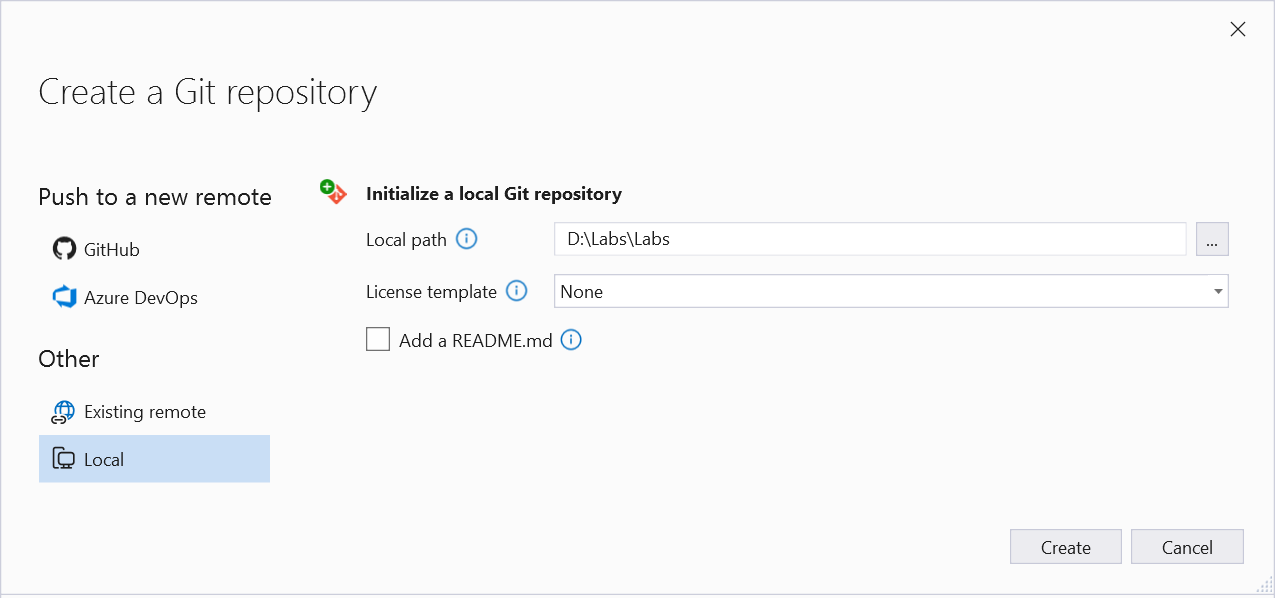
Figure 1.19. Creating a local repository in the IDE
The Git Changes window shows the changed files and the message box (Fig. 1.20). Review the difference before committing. The Commit All action may include all changes, so for selected files, stage exactly those files first. After the commit, change just one line and compare the new state with the previous one: this clearly shows how a history differs from copies like final2.cpp.
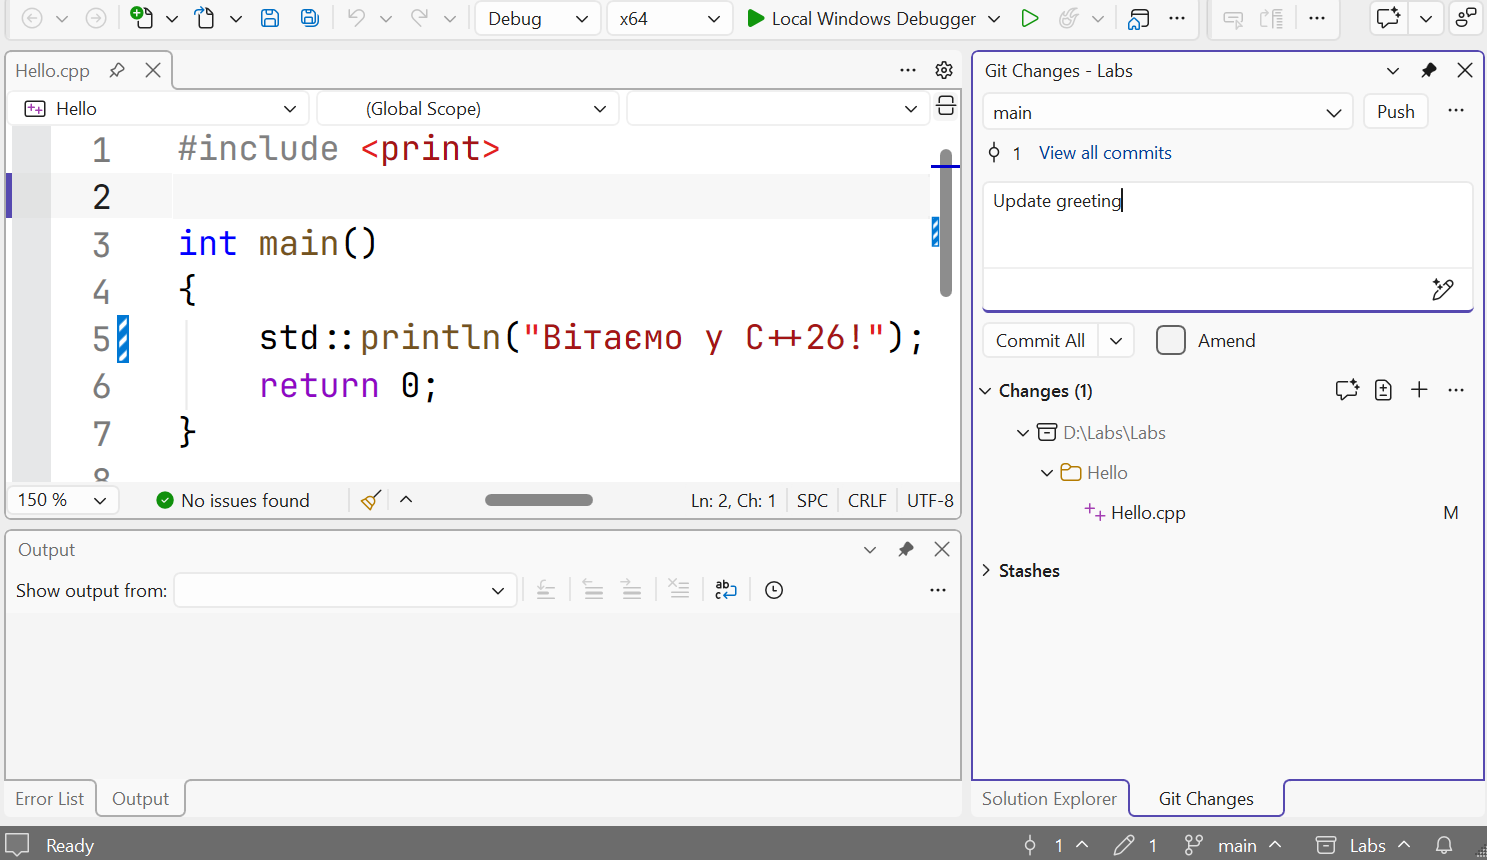
Figure 1.20. Reviewing changes before a commit
Through Git → View Branch History, open the history in Git Repository (Fig. 1.21). Select a commit, read the message, and look at the differences. Don’t confuse viewing an old state with removing new work. Before commands that discard changes, check git status; uncommitted text that has been discarded may be lost. For this topic, it is enough to be able to read the history and explain each of your own commits.
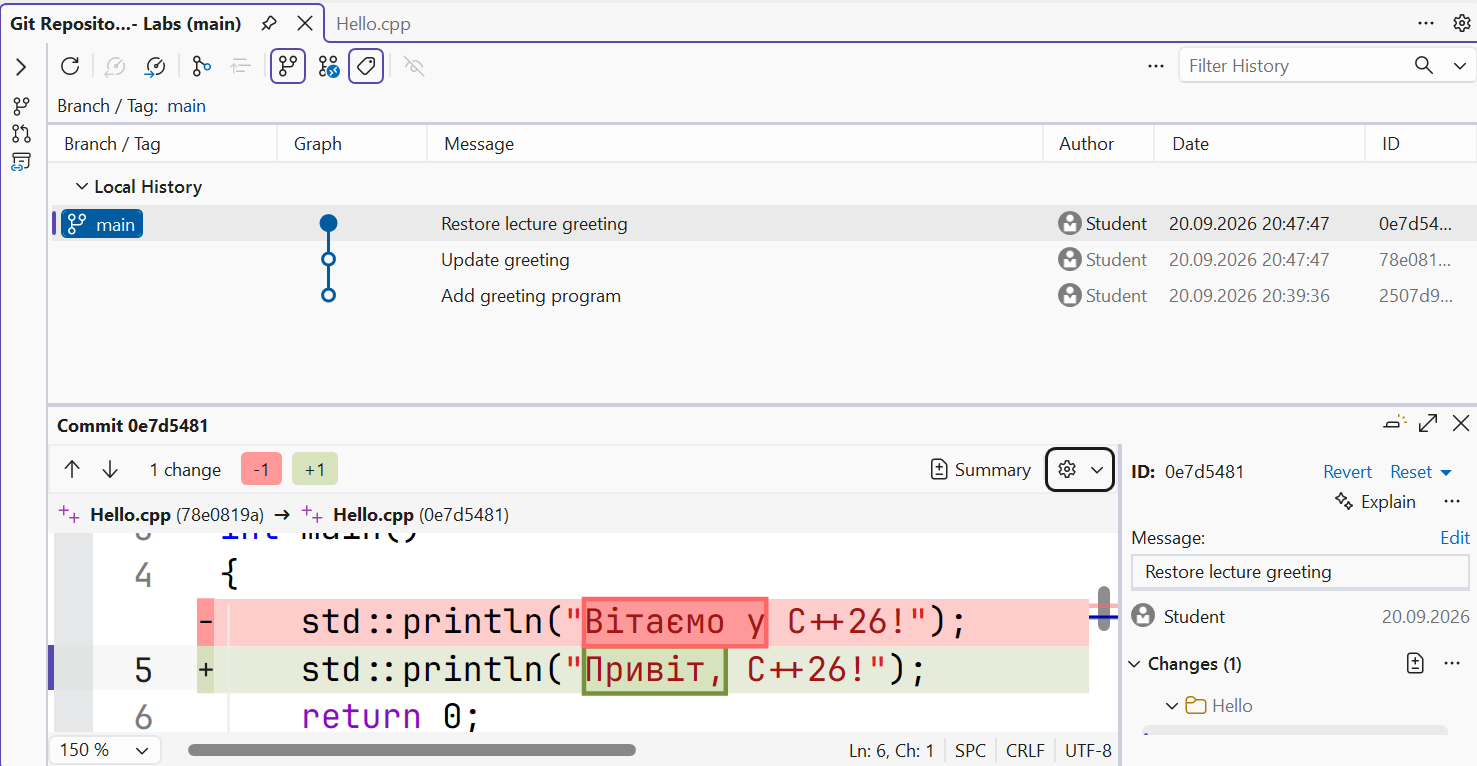
Figure 1.21. Commit history and file differences
Remote repository
To publish your work voluntarily, create an empty repository on GitHub, choose its visibility, and copy its address. After checking the list of files, add the address as origin and push the branch. In the example below, USER and REPOSITORY are placeholders for your own values, not a ready-made destination:
powershell
git remote add origin https://github.com/USER/REPOSITORY.git
git push -u origin main
push transfers commits, not any unsaved editor text. The -u option links the local branch to the remote one. Authenticate using a method GitHub supports; don’t paste a password or token into a .cpp file, a README, or the address in a command. git clone creates a local copy of an existing repository, and git pull fetches and integrates remote changes. If the server rejected a push, read the reason first; forcibly rewriting history is not a universal fix.
A small experiment in a branch
A branch is a movable reference to a commit. It lets you develop a separate change without immediately moving the main main branch. Before switching, save your current work with a commit and make sure git status is clean. To add a new line to the business card, you can run the following cycle:
powershell
git switch -c card-details
# Edit Hello.cpp, build and run the program.
git add Hello.cpp
git commit -m "Add card details"
git switch main
git merge card-details
git tag v1.0
The path in git add must match the location of the file in your solution. switch -c creates a branch and switches to it; merge integrates its history into the current branch. If main hasn’t changed, Git often simply moves its pointer forward (fast-forward). If both branches changed the same lines, a conflict may occur: you need to read it and resolve it before completing the merge. For your first exercise, make an independent simple change. A tag v1.0 marks a selected, verified commit and doesn’t move automatically with new commits. A regular push of a branch doesn’t publish all local tags. See the command details at https://git-scm.com/docs/git-switch and https://git-scm.com/docs/git-merge.
To discard an uncommitted change to one file, first review git diff -- Hello.cpp. If you really don’t need to keep this change, git restore -- Hello.cpp restores the working file from the index. This discards work not saved in Git; the command doesn’t create a backup copy. To undo a commit that has already been published, use a different approach: a new commit with the opposite change, not erasing shared history.
How to record the tool version in your report
Besides the cl banner, MSVC provides predefined macros. _MSC_VER indicates the major and minor versions of the compiler, and _MSVC_LANG holds the value for the selected standard mode. In MSVC, the standard __cplusplus reflects the actual mode if you add /Zc:__cplusplus; without this switch, its value may keep the historical 199711L. That is why a single line with __cplusplus isn’t enough to draw conclusions about the installed MSVC. Documentation: https://learn.microsoft.com/cpp/preprocessor/predefined-macros.
In a program with <print>, you can add std::println("MSVC: {}", _MSC_VER); inside main, and similar lines for other macros. Record the actual values after building with /Zc:__cplusplus in the README. A numeric macro doesn’t replace checking a specific feature: the completeness of library support is determined from the documentation and by compiling an example.
Common beginner problems
Table 1.3. Diagnosing your first program and repository
| Symptom | What to check |
|---|---|
| No C++ template | The Desktop development with C++ workload in the Installer and the language filter in the new project window. |
cl not found | Open Developer PowerShell after installing MSVC; check which toolset is active. |
<print> not found | The library and toolset version. Update MSVC; check the standard in the configuration you need. |
The std module not found | The ISO C++23 modules build option and the standard; for a simple CLI example, use the <print> header. |
| Old text is printed after a change | Whether the file is saved, whether the build succeeded, the startup project, and the path to the executable. |
Two main functions | Put the examples in separate projects or replace the code of one file; don’t link all the examples together. |
| Ukrainian text is garbled | The file’s UTF-8 encoding, /utf-8, the font, and how you view the output; don’t mix narrow and wide APIs at random. |
| Git asks for the author’s name | Set user.name and user.email; this is separate from signing in to GitHub. |
.exe and .obj files end up in Git | The .gitignore rules and whether the build outputs were already added to tracking. |